free5GC
Overview
free5GC is an open-source 5G Core network implementation that originated at WireLab, National Yang Ming Chiao Tung University (NYCU) in Taiwan, and is now a Linux Foundation project. It supports 3GPP Release 17 and beyond and provides a modular, cloud-native platform for developing, testing, and integrating 5G networks.
This guide deploys free5GC with free5gc-compose and connects OCUDU's CU-CP and CU-UP to it. Once the CU is connected, attach any DU and UE combination OCUDU supports: a ZeroMQ software UE, a physical O-RAN radio unit, or a COTS device.
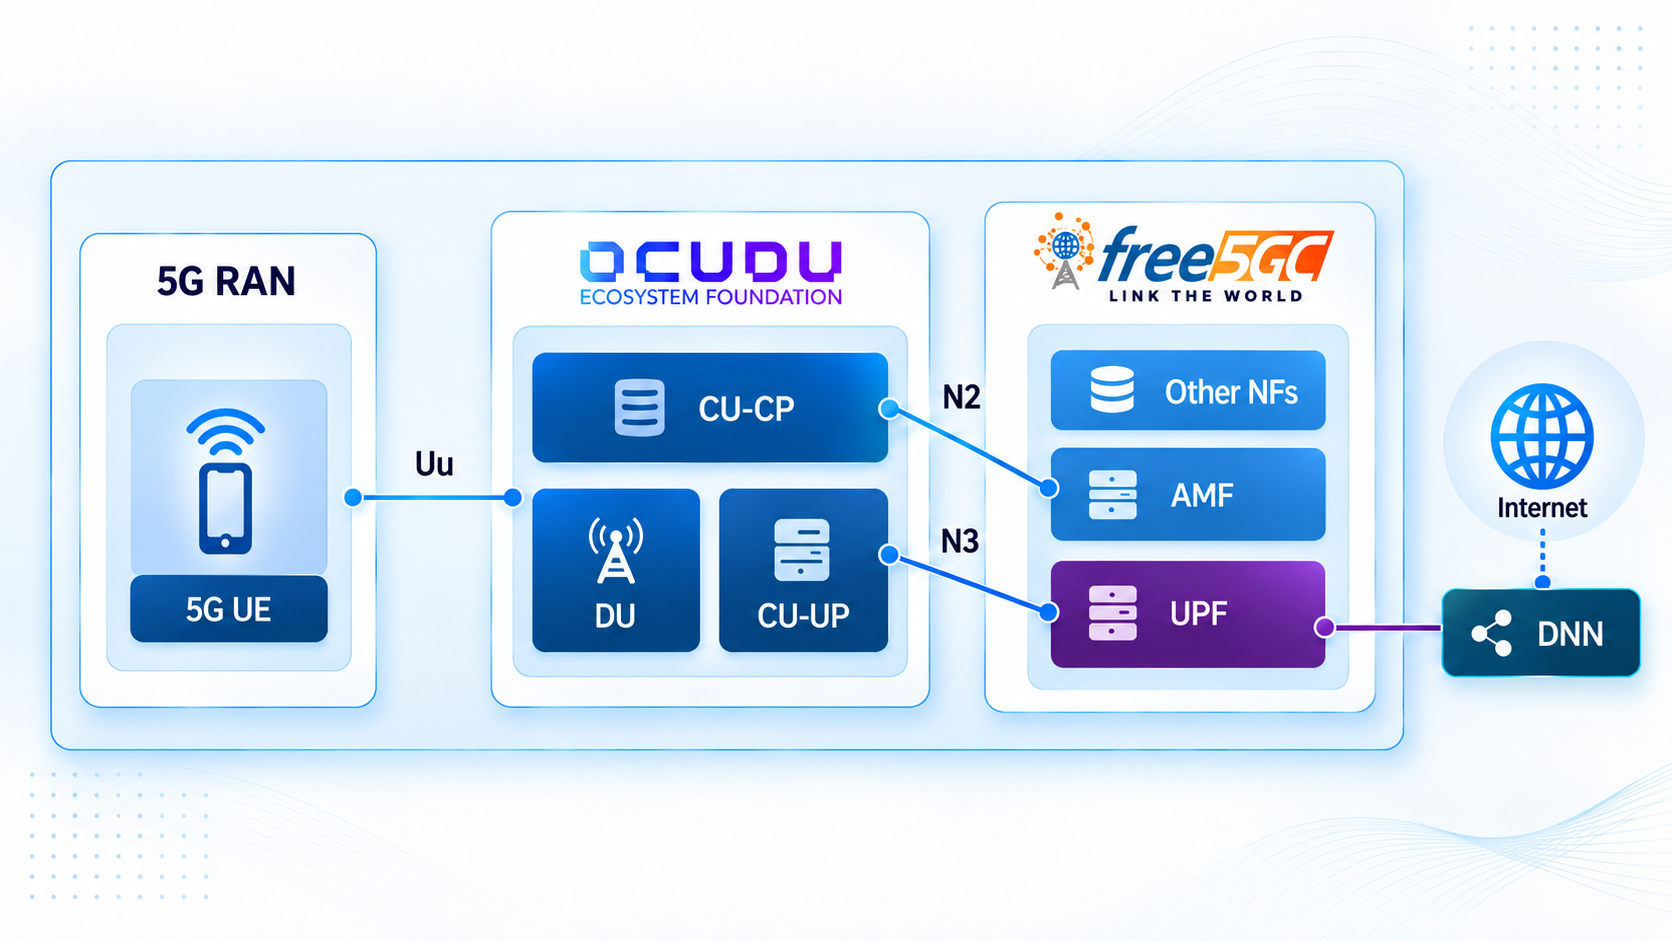
This guide uses free5gc-compose to deploy free5GC in Docker. To build and run free5GC in host mode instead, see Integration free5GC and OCUDU with ZeroMQ.
Resources
Pre-requisites
- Ubuntu-based 22.04 (or later) VM or host
- CPU: 4 cores or more
- RAM: 16 GB or more
Connecting a DU and UE has its own prerequisites, covered in the tutorial for the RAN setup you choose in step 3.
1. Deploy free5GC
Clone free5gc-compose and set up the environment:
git clone https://github.com/free5gc/free5gc-compose.git
cd free5gc-compose
./env-setup.sh
The setup script automatically installs gtp5g and Docker if they aren't already present. If you started from an empty environment, log out and log back in so the docker group takes effect.
Start the compose stack from the free5gc-compose directory:
docker compose up
The compose stack assigns fixed addresses to AMF and UPF:
- AMF:
10.100.200.16 - UPF:
10.100.200.2
Open a new terminal and confirm the CU can reach AMF over Docker's network bridge:
ip -4 addr show br-free5gc

# expect to see
# 4: br-free5gc: <BROADCAST,MULTICAST,UP,LOWER_UP> mtu 1500 qdisc noqueue state UP group default
# inet 10.100.200.1/24 brd 10.100.200.255 scope global br-free5gc
#    valid_lft forever preferred_lft forever
Ping AMF and UPF from the host:
ping 10.100.200.16 -c 3

# expect to see
# PING 10.100.200.16 (10.100.200.16) 56(84) bytes of data.
# 64 bytes from 10.100.200.16: icmp_seq=1 ttl=64 time=0.082 ms
# 64 bytes from 10.100.200.16: icmp_seq=2 ttl=64 time=0.086 ms
# 64 bytes from 10.100.200.16: icmp_seq=3 ttl=64 time=0.078 ms
#
# --- 10.100.200.16 ping statistics ---
# 3 packets transmitted, 3 received, 0% packet loss, time 2052ms
# rtt min/avg/max/mdev = 0.078/0.082/0.086/0.003 ms

ping 10.100.200.2 -c 3

# expect to see
# PING 10.100.200.2 (10.100.200.2) 56(84) bytes of data.
# 64 bytes from 10.100.200.2: icmp_seq=1 ttl=64 time=0.137 ms
# 64 bytes from 10.100.200.2: icmp_seq=2 ttl=64 time=0.046 ms
# 64 bytes from 10.100.200.2: icmp_seq=3 ttl=64 time=0.047 ms
#
# --- 10.100.200.2 ping statistics ---
# 3 packets transmitted, 3 received, 0% packet loss, time 2042ms
# rtt min/avg/max/mdev = 0.046/0.076/0.137/0.042 ms
2. Configure and run OCUDU
Set up the configuration directory:
mkdir -p ~/ocudu-config
Install OCUDU by following the OCUDU Installation Guide.
Create ~/ocudu-config/cu_cp.yml, pointing the CU-CP at free5GC's AMF. The compose stack always assigns AMF the address 10.100.200.16; bind_addr is the host's own address on the br-free5gc bridge:
cu_cp:
  amf:
    addr: 10.100.200.16        # AMF's address, fixed by free5gc-compose.
    port: 38412
    bind_addr: 10.100.200.1    # The host's own address on the br-free5gc bridge.
    supported_tracking_areas:
      - tac: 1
        plmn_list:
          - plmn: "20893"      # Must match free5GC's PLMN.
            tai_slice_support_list:
              - sst: 1
                sd: "010203"   # Must match a slice free5GC advertises.
  e1ap:
    bind_addr: 127.0.20.1
  f1ap:
    bind_addr: 127.0.10.1
Create ~/ocudu-config/cu_up.yml, pointing the CU-UP's N3 interface at the same bridge address so free5GC's UPF can reach it:
cu_up:
  e1ap:
    cu_cp_addr: 127.0.20.1
    bind_addr: 127.0.20.2
  ngu:
    socket:
      - bind_addr: 10.100.200.1 # Reachable by free5GC's UPF over the br-free5gc bridge.
  f1u:
    socket:
      - bind_addr: 127.0.10.1
Run the CU-CP:
sudo ~/ocudu/build/apps/cu_cp/ocucp -c ~/ocudu-config/cu_cp.yml

# expect to see
# E1: Listening for new connections on bind addresses 127.0.20.1, port 38462...
# N2: Connection to AMF on 10.100.200.16:38412 completed
# F1-C: Listening for new connections on bind addresses 127.0.10.1, port 38472...
# ==== CU-CP started ===
# Type <h> to view help
Run the CU-UP:
sudo ~/ocudu/build/apps/cu_up/ocuup -c ~/ocudu-config/cu_up.yml

# expect to see
# E1: Connection to CU-CP completed (configured addrs 127.0.20.1, port 38462)
# ==== CU-UP started ===
# Type <h> to view help
3. Connect a DU and a UE
OCUDU's DU and any UE that authenticates against free5GC completes this setup. Point the DU's F1AP config at the CU-CP's f1ap.bind_addr above (127.0.10.1), and make sure the DU's plmn and slice match the CU config. Then follow the tutorial for your RAN setup:
-
For a ZeroMQ software UE, with no SDR hardware required, see the srsUE tutorial or the ZeroMQ tab of Deploying a CU/DU split over F1 to build and run srsUE. The reference UE config files in those tutorials use credentials that do not match free5GC's default subscriber, so use
~/ocudu-config/ue.confbelow instead:#####################################################################
# srsUE configuration file
#####################################################################
[rf]
# Using ZMQ device to connect to the gNB.
# The ports and srate are configured to match your du_zmq.yml.
freq_offset = 0
tx_gain = 50
rx_gain = 40
srate = 23.04e6
nof_antennas = 1
device_name = zmq
device_args = tx_port=tcp://127.0.0.1:2001,rx_port=tcp://127.0.0.1:2000,base_srate=23.04e6
# According to your du_zmq.yml, the gNB is on band 3.
# The dl_arfcn is 368500, which corresponds to band 3.
[rat.eutra]
dl_earfcn = 2850
nof_carriers = 0
[rat.nr]
bands = 3
nof_carriers = 1
max_nof_prb = 106
nof_prb = 106
[rrc]
release = 15
ue_category = 4
[usim]
# Matches free5GC's default webconsole subscriber.
mode = soft
algo = milenage
imsi = 208930000000001
k = 8baf473f2f8fd09487cccbd7097c6862
opc = 8e27b6af0e692e750f32667a3b14605d
imei = 356938035643803
[nas]
apn = internet
apn_protocol = ipv4
[slicing]
enable = true
nssai-sst = 1
nssai-sd = 66051
[gw]
netns = ue1
ip_devname = tun_srsue
ip_netmask = 255.255.255.0
[gui]
enable = false
[log]
all_level = warning
filename = ~/ocudu-config/logs/ue.log
phy_lib_level = none
all_hex_limit = 32 -
For a physical O-RAN radio unit, see Connecting an O-RAN RU.
-
For a COTS phone over a USRP, see Connecting a COTS UE.
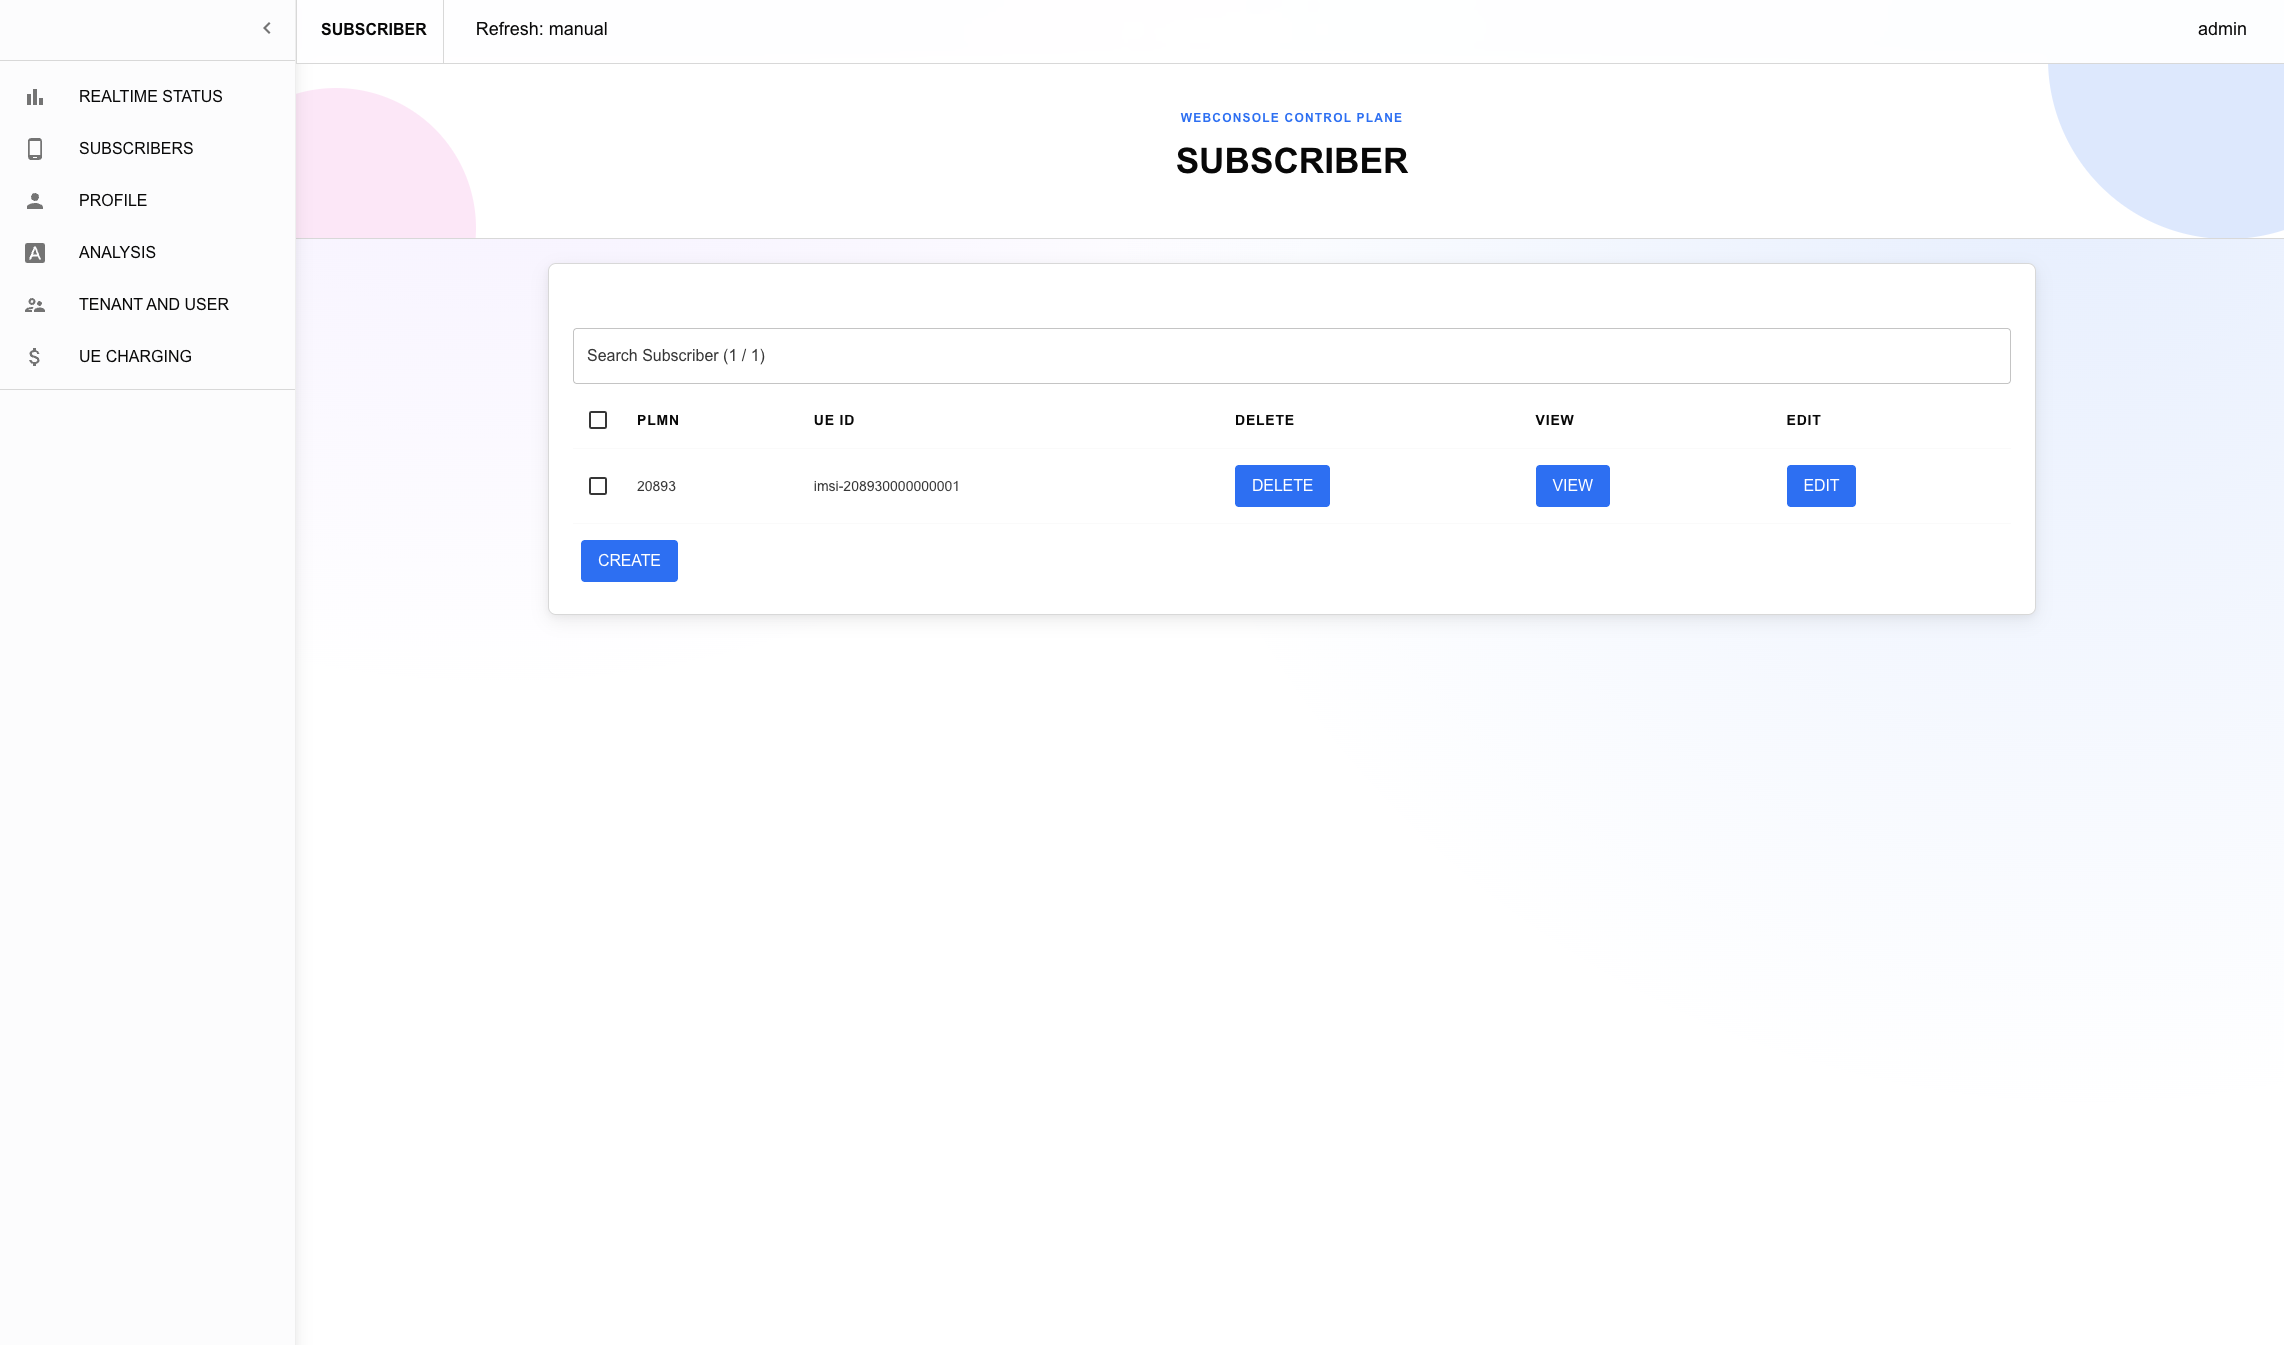
Before connecting a UE, create a matching subscriber in free5GC's webconsole. Open a browser at http://<VM IP>:5000, log in with the account admin and password free5gc, then on the Subscribers page click Create to add a subscriber with the default values.
Once the UE registers, verify connectivity with a ping test through its tunnel interface, as shown in whichever RAN/UE tutorial you followed.
Conclusion
You have deployed free5GC with free5gc-compose and connected OCUDU's CU-CP and CU-UP to it.
Customized deployment
Deploy free5GC and OCUDU on separate machines
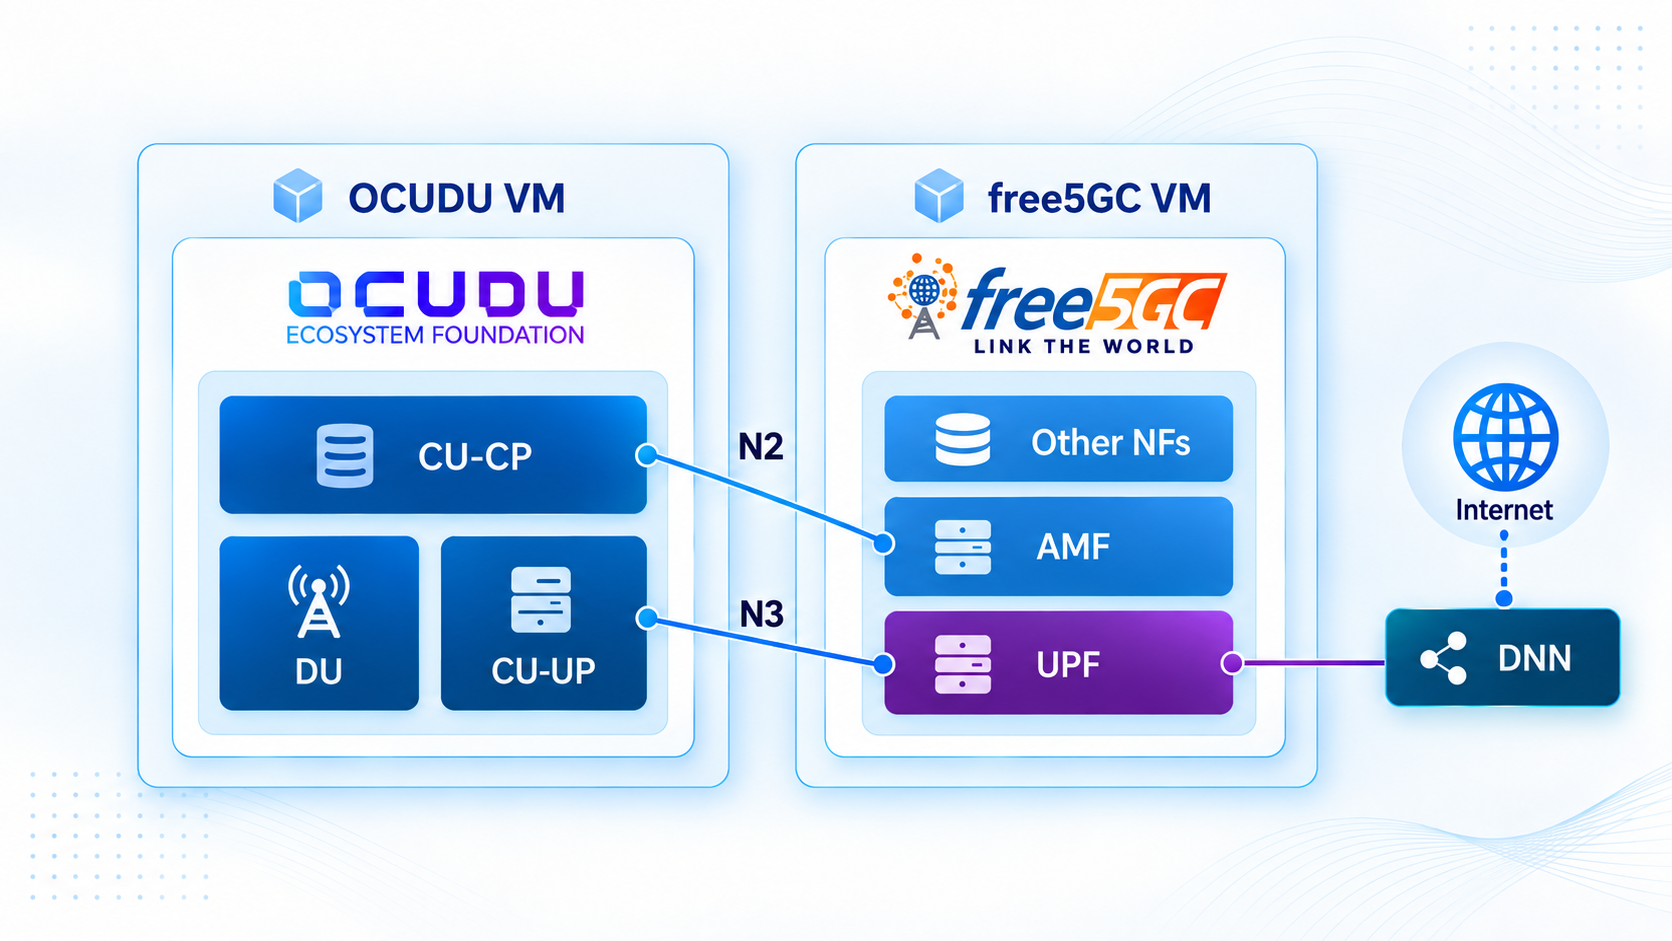
free5gc-compose's AMF and UPF containers advertise their internal Docker bridge addresses (10.100.200.16 and 10.100.200.2) in the NGAP and PFCP signaling they send to the RAN. This means simply publishing ports for these services is not enough: OCUDU's CU-UP would still be told to send N3 GTP-U traffic to UPF's internal address 10.100.200.2, which is not reachable from another machine. Rather than re-addressing every NF, route the OCUDU VM's traffic for that subnet through the free5GC VM, so the containers stay reachable at their existing addresses.
On the free5GC VM, enable IP forwarding so the host can route traffic between its LAN interface and the br-free5gc bridge:
sudo sysctl -w net.ipv4.ip_forward=1
Docker's default FORWARD policy drops traffic that is routed into a container network rather than published through ports:. Add an explicit DOCKER-USER rule to allow traffic from the OCUDU VM:
sudo iptables -I DOCKER-USER -s <OCUDU_VM_IP> -d 10.100.200.0/24 -j ACCEPT
Replace <OCUDU_VM_IP> with the OCUDU VM's address (or its subnet, for example 192.168.1.0/24). This rule does not persist across reboots. Re-apply it, or add it to your distribution's persistent iptables rules, after the free5GC VM restarts.
On the OCUDU VM, add a route to the free5GC Docker bridge subnet via the free5GC VM:
sudo ip route add 10.100.200.0/24 via <FREE5GC_VM_IP>
Replace <FREE5GC_VM_IP> with the free5GC VM's LAN address.
Verify that the OCUDU VM can reach AMF and UPF at their existing Docker addresses:
ping 10.100.200.16 -c 3
ping 10.100.200.2 -c 3
Update cu_cp.yml and cu_up.yml so the bind_addr fields use the OCUDU VM's own address instead of the free5GC VM's bridge gateway (10.100.200.1), since that address only exists on the free5GC VM:
cu_cp:
  amf:
    addr: 10.100.200.16        # Unchanged, now reachable through the route above.
    bind_addr: <OCUDU_VM_IP>   # The OCUDU VM's own address.
cu_up:
  ngu:
    socket:
      - bind_addr: <OCUDU_VM_IP> # The OCUDU VM's own address.
amf.addr and the UPF address embedded in N3 signaling are left unchanged, since the route added above makes 10.100.200.0/24 reachable from the OCUDU VM directly.
Use 00101 as the PLMN ID
By default, free5gc-compose and this guide's OCUDU config both use PLMN 20893 (mcc: 208, mnc: 93). If you want to switch to the 00101 test PLMN used elsewhere in the OCUDU docs, the PLMN is duplicated across several free5GC NF config files, each of which must be updated to match:
| File | Field(s) |
|---|---|
config/amfcfg.yaml | servedGuamiList[].plmnId, supportTaiList[].plmnId, plmnSupportList[].plmnId |
config/nrfcfg.yaml | DefaultPlmnId |
config/ausfcfg.yaml | First entry of plmnSupportList (leave the 123/45 entry untouched) |
config/nssfcfg.yaml | supportedPlmnList[0], supportedNssaiInPlmnList[0].plmnId (leave the other example PLMNs further down untouched) |
config/smfcfg.yaml | plmnList |
For each mcc/mnc pair, change 208/93 to 001/01:
mcc: "001" # Mobile Country Code
mnc: "01"  # Mobile Network Code
Quote mcc/mnc values that have a leading zero, for example "001" and "01". YAML parses an unquoted 001 as an octal literal, which resolves to 1, not the string "001" that free5GC expects.
UPF, WebUI, PCF, UDM, UDR, CHF, and NEF have no PLMN field and do not need to change.
After editing the config files, restart the stack:
docker compose down
docker compose up
Finally, update the OCUDU and UE side to match:
cu_cp.yml: changeplmn: "20893"toplmn: "00101".- Your DU config: change its
plmnfield to"00101"to match. - Your UE's subscriber credentials: use an IMSI starting with
00101instead of20893. - Re-create the subscriber in the free5GC webconsole with the new IMSI, since a subscriber's PLMN is derived from its SUPI/IMSI.